How to Create a Gradient Website Background in Photoshop

Friday, 14 February 2014
Create a Gradient Website Background in Photoshop
NS8Z76XBFPFD 
Photoshop is a handy tool when it’s come to photo editing. Creating a gradient image for a website background in Photoshop is easy. You just need to define the starting and ending point in an image to create a gradient of two or multiple colors. Here are the steps to make a simple gradient image for your website.
1. Go to the File menu and click New.
New in the File Menu

2. Specify the Height and Width for an image and click Ok.
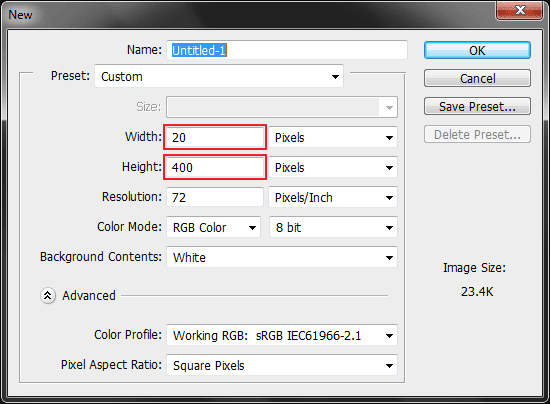
Width and Height in New Dialog Box

3. In the menu bar, click Layer > New > Layer.
Add New Layer

4. In the RGB Color Panel, Select the Foreground and Background Color.
Note: If the RGB Color Panel isn’t visible, click on the Window > Color.
Foreground and Background Color in RGB Color Panel

5. Now click on the Gradient Tool and select the Gradient Type. You can apply different types of gradient in Photoshop such as Linear, Radial, Angle, Reflected and Diamond. But, for this tutorial we’re using linear gradient.
Gradient Tool and Gradient Types

6. In the image, place the pointer to the starting point (where you want to apply the gradient from), and drag your cursor till the ending point, while dragging hold the shift key to make the line straight.
Pointer being Dragged
Gradient Image

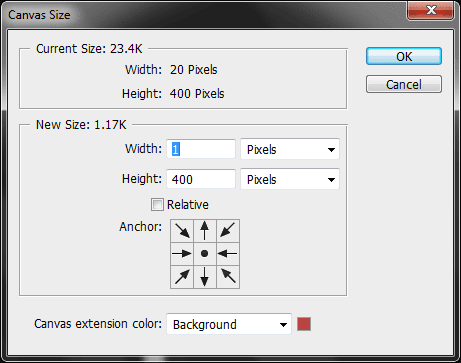
7. Now let’s move to the the part of saving few KBs or Bytes, to reduce the size of an image (that may help your site load faster) go to the Image > Canvas Size and make the width to 1px (because it will be repeated horizontally) then click Ok.
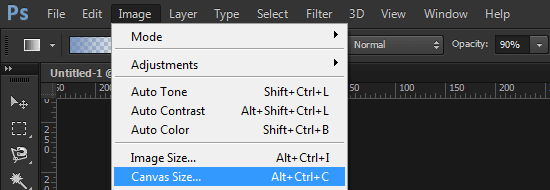
Canvas Size in the Image Menu Canvas Size Dialog box

8. When you finish editing, go to the File menu and click Save for Web.
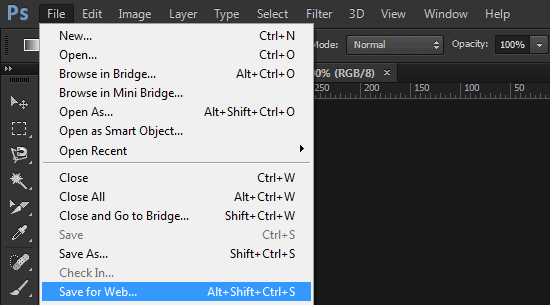
Save for Web in the File Menu

9. In the Save for Web dialog box, select the file format as JPEG and set the Quality to High (60) or Very High (90) then hit Save.
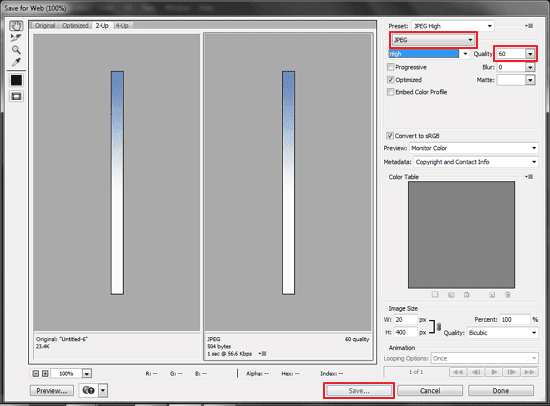
File Format, Quality and Save in the Save for web Dialog box


Tip
  • You can also use Presets or your own custom version of that to make the gradient of two or multiple colors, for this click on the gradient editor on the left side of the Linear Gradient.

How to Find Hex Color Codes from a Website

Saturday, 18 January 2014
Find and Grab the Hex Color Codes from a Website
Hexadecimal Color Codes are used to design or decorate the web pages, in CSS you can define the hex color of six digits, which start with a # sign.  The lowest value of hexadecimal is #000000 (Black) and the highest value is #FFFFFF (White), on the other hand, in RGB (Red Blue and Green) color the lowest value is 0 and the maximum value is 255.

There are several add-ons and utilities available to find Hex Color Code from a website. But, for this tutorial we are using Rainbow Color Tools (for Firefox) and ColorZilla (for Chrome).

Finding Hex Color Code Using Mozilla Firefox

1. Click on the Firefox button.
Firefox button

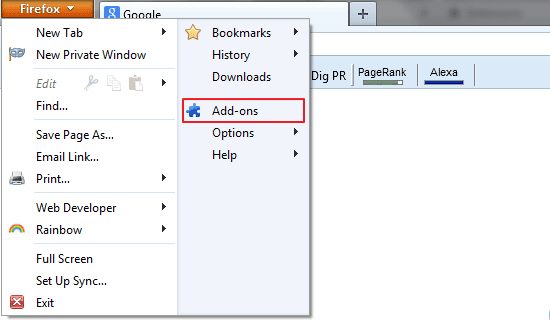
2. In the sub-menu, click Add-ons.
Add ons in Firefox Submenu

3. An add-ons manager tab will appear, in the search bar type Rainbow Color Tools and hit enter. When Firefox finishes searching for add-ons, in search results you’ll see Rainbow Color Tools, click Install.
Search bar and Install button

4. To finish the installation process, you need to restart the browser, click Restart now.
Restart now

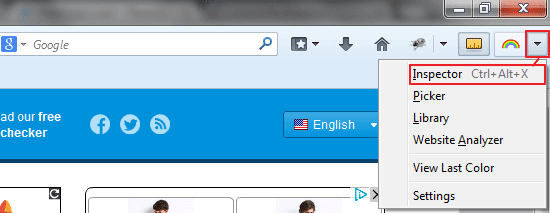
5. Now you will see the Rainbow icon on the right side of your browser window. Click the drop-down button next to the Rainbow icon, in the drop-down list click Inspector.
Drop Down button and Inspector in Rainbow Add on

6. Move your mouse over the website you want to find the hex color, and then left click to copy it.
Hex Color Inspector

Finding Hex Color Code Using Google Chrome

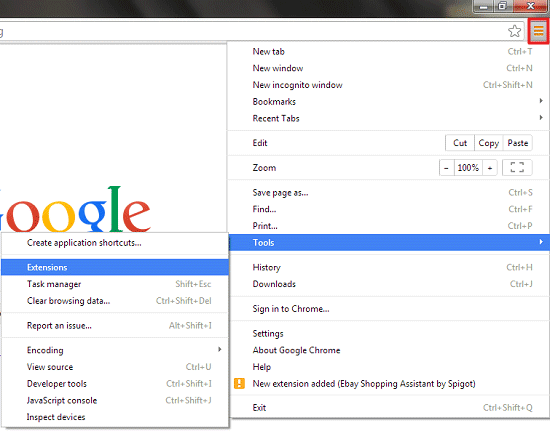
1. In the Chrome Menu point your cursor to the Tools and click Extensions.
Menu, Tools and Extensions

2. Click Get more extensions (at the bottom of your extensions list).
Get more extensions

3. In the chrome web store, search ColorZilla, to install, click on the Plus button next to the ColorZilla.
Chrome web store Search bar

4. When the confirmation dialog box appears, click Add.
Extension confirmation dialog box

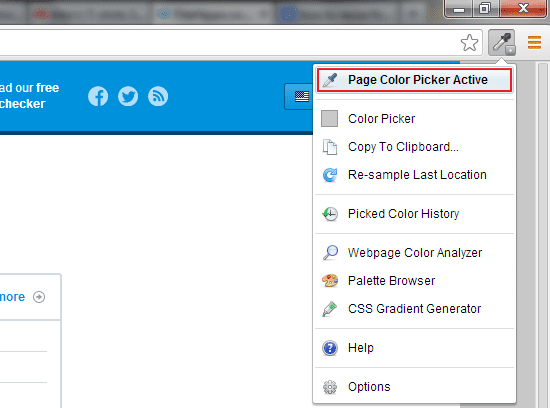
5. Now go to the website you want to find hex color value and click the Pen icon (on the right side of your chrome window), under the pen symbol click Page Color Picker.
Page Color Picker in ColorZilla Extension

6. Move over your cursor to select hex color, and then left click your mouse to copy.
Page Color Picker Active in ColorZilla

How to Show Pixels while Cropping an Image in Photoshop CC and CS6

Friday, 10 January 2014
Show Pixels while Cropping an Image in Photoshop
In the latest versions (CC and CS6) Photoshop has come with an all new crop tool. When you crop the image in Photoshop CC or in CS6, the default rulers in a crop tool will display the inches, but for a web designer it is more convenient to measure an image in Pixels rather than in inches or any other measurement. You can change the default rulers to pixels by setting up the Units & Rulers.


Follow the instructions below to show the width and height in Pixels, while cropping an image in Photoshop CC or CS6.

1. Click on the Move Tool.
Move Tool

2. Click Edit.
Edit Menu

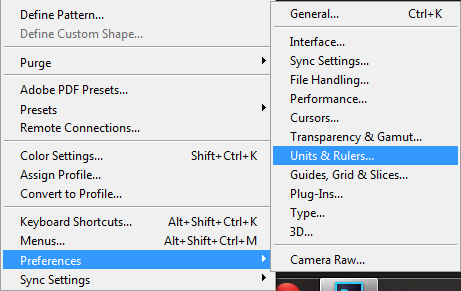
3. Point your cursor to the Preferences and click Units & Rulers.
Units & Rulers in Preferences

4. Under the Unit section, you will see Rulers, click the drop-down list next to the rulers, select Pixels, and then click OK.
Unit section in Units & Rulers

How to Change the Color Theme in Photoshop CC

Monday, 6 January 2014
Change the Color Theme in Photoshop CCPhotoshop is an essential tool for every web designer. The first version (0.07) of Photoshop was released in January 1988 and the latest is Photoshop CC (14.0), which was released in June 2013. The default theme in Photoshop CC is dark, you can change it to 3 other lighter themes by following the simple steps below.


1. In the Application Menus, click Edit.
Edit Menu in Photoshop CC
2. Under the Edit menu, point your cursor to the Preferences and click Interface.
Preferences and Interface in the edit menu
3. A dialog box will appear, in the Appearance section, there are 3 other lighter color themes, select the theme and then click OK.
Color Themes
[*] Below the color theme, you can also customize your standard screen, full screen and the menus color by clicking on the drop-down list.

How to Convert a Word Document to PDF in Word 2013 and 2010

Friday, 3 January 2014
Convert Word Document to PDFEarlier in Microsoft office 2007, it was necessary to install the Add-in to convert a Word document to PDF. Although in MS office 2013 and 2010, you don't need to install any Add-in, Microsoft has come with an inbuilt PDF converter, using this feature you can effortlessly save your file as PDF. Here's the steps involve to Convert word document to PDF.


Microsoft Word 2013

1. Click on the File Tab.
File Tab in Microsoft Word 2013


2. Under the file tab click Export.
Export button in Microsoft Word 2013


3. Click Create PDF/XPS.
Create PDF/XPS button in Microsoft Word 2013


4. In the navigation pane select the location and folder where you want to save the file, enter your desired file name and then click Publish.
Publish PDF/XPS dialog box in Microsoft Word 2013

Microsoft Word 2010

1. Click on File.
File Tab in Microsoft Word 2010


2. In the file tab click Save & Send.
Save & Send button in Microsoft Word 2010


3. Under the File Types click Create PDF/XPS Document.
Create PDF/XPS Document button in Microsoft Word 2010


4. In the Create PDF/XPS Document section (on the right side), click Create PDF/XPS button.
Create PDF/XPS button in Microsoft Word 2010


* The fifth step is same as a fourth step mentioned above in "Microsoft Word 2013".

Tip
  • In Microsoft Word 2007, to convert a Word document to PDF, you need to download the Add-in from this link.

How to Find and Update Drivers Online

Tuesday, 17 December 2013
Drivers are required to make the communication between Hardware and Software. If your system is not running well as it previously does or an unexpected Windows error has occurred e.g., Display driver stopped responding and has recovered, at that time the driver update could benefit the system. Updating drivers has other benefits as well i.e., new features, improved performance of your device, security and stability.

There are many Online as well as Offline tools available which offers driver update for your system. But, today we will discuss the Intel Driver Update Utility, which detects outdated drivers automatically and recommends you the newer version of drivers.

We're using Online Utility because of the two simple reasons, first Intel is a trusted source (Software's can sometimes detect unwanted drivers that you don't need to install.) and second you can download the drivers in your hard drive and make use of them in the future.

If you're using Internet Explorer, first download and install the ActiveX*/Java* installer, For Chrome, Firefox and Safari, download the latest version of java and install. You can use any of these four browsers (as mentioned above) to access the page, but for this purpose we're using Google Chrome and Mozilla Firefox.

Updating Drivers Using Google Chrome

1. Go to the official website of Intel here, and click "Check your system for updates".
Check your system for updates button


2. Click either "Run this time" or "Always run on this site" to the java plugin.


3. When SRLApplet application dialogue box appear, click Run.
SRLApplet Application Dialog Box

4. On the next dialogue box, allow access and control to the java application by clicking Allow.
Security Warning Dialog Box


5. Click yes to the Windows installer.
Windows Installer UAC Dialog Box

6. On the System Requirement Lab dialogue box click yes.
System Requirements Lab UAC Dialog Box

7. When the installation finished processing, click Expand button.
Expand Button in Intel Driver Update Utility


8. You'll see which driver is current (not required any update) and which required an update. Download      the drivers which required an update and install them on your computer by executing the setup file in it.
Download Now Button

Updating Drivers Using Mozilla Firefox

1. Go to the Intel's official website here, and click "Check your system for updates".
Intel Driver Update Utility, Check your system for updates button


2. Allow Intel to run "Java Platform SE 7 U" plugin by clicking Allow (on the upper right side of your          browser).
Java Platform SE 7 U Plugin


3. Select "Allow and Remember" on both plugins "Adobe Flash" and "Java Platform SE 7 U", and then press OK.
Adobe Flash and Java Platform SE 7 U Plugins


.

* The remaining steps are similar as mentioned above in "Updating Drivers Using Google Chrome".

There are other reliable sources as well, form where you can manually download the drivers. Here's the list of manufacturer websites.
  1. NVIDIA
  2. Acer
  3. Alienware
  4. Apple
  5. Asus
  6. Dell
  7. Gateway
  8. HP (Hewlett-Packard)
  9. Samsung
  10. Sony
  11. Toshiba

Notes
  • Not all driver updates are performance enhancing.
  • When drivers finished installation, your system may require reboot to take any effect.
  • You can also manually download and install the drivers form Intel Download Center.
  • There are Software Tools as well to update your system drivers, example of such tools are Driver Booster and Driver Detective.